 Important Notice— Our url is


Since the Coronavirus Pandemic, there has been a major shift in the traditional form of recruitment & hiring. Now companies are working remotely and leveraging video conference systems to take interviews. If you are also on the Job hunt and new to virtual settings, then there are some considerable things you should keep in mind. In this blog, we will provide a complete list of do’s and don’ts of virtual interviews. Also, we will assist you in setting up Virtual interview background and setup tips for Zoom, Microsoft Teams, Google Meet and Cisco Webex.
Technology has streamlined the process of hiring; companies today are earnestly taking interviews using tools such as Zoom, Microsoft Teams, Google Meet and Cisco Webex. Adopting technical tools for interviews helps companies save time and keep present and future employees safe from the Spread of Covid-19 infection.
It also ensures that the hiring process’s efficiency and effectiveness are not compromised. Remote interviewing enables recruiters to swiftly reach a diverse talent pool and screen prospective candidates cost-effectively.
Some Do’s for your Next Virtual Job Interview
Below are a few things you must Do right before your video interview:
1. Ensure Good Internet Connectivity:
Test your internet connection, webcam, and microphone before the final interview. Use good-quality headphones and take a short practice call with your friend to get familiar with the tool. Resolve any technical issues beforehand. Check Latency speed to ensure your video conferencing goes well through.
2. Dress Up Professionally:
Just because you are giving an interview from the comfort of your home, it doesn’t mean you can show up in your favorite onesie; remember, the interviewer can still see you in the video. So, wear formal clothes as if you are heading to the company’s office for the interview.
3. Be a Healthy Mind in a Healthy Body:
Keep yourself fit both mentally & physically by trying to exercise daily, as that will keep your mind sharp and make you look more radiant in the interviews.
4. Let the Light Shine on You:
Proper lighting is essential, so don’t be in a dimly lit room. If there is artificial lighting, have the light focus on your face. The light should never be behind your head or facing the camera, as it might make it difficult for the interviewer to see you clearly. Use a selfie light if needed there are many available on Amazon
5. Invest in a Good Quality Webcam, Headphones, Speakers and microphone:
Nowadays, most laptops and desktops have built-in webcams, so you should be all good, but for safety, do test calls with friends to ensure they can hear and see you clearly. If your Webcam or microphone has issues with audio or video clarity, we suggest investing in a quality webcam and small speakers for your desktop or laptop.
We suggest going with Logitech C930e Webcam! Or, if you really want to splurge, go for Logitech MX Brio Ultra HD Webcam. Both these Webcams have been personally tested by our candidates while giving interviews and provide superior audio and video transmission clarity.
Using a Speaker and Microphone set up ensures you don’t look like an airline pilot or a Call center representative while taking the Interview. You can find Speakers and microphone on amazon etc. and we would strongly suggest using the Yeti Blue Microphone .
6. Keep a Check on Your Body Language:
Work on your body language, keep it natural, and don’t overdo hand gestures. Try to answer each question with a smile to look more confident. Also, look straight into the Webcam rather than looking at your books, opening another screen, or checking your phone while on the Video call.
Quick TIP: When in the Video conference try to Position the image of the Interviewer directly under the webcam to ensure you don’t appear looking away from the Interviewer and you have better eye contact.
Also, read about Common Body Language Mistakes to Avoid During a Job interview.
7. Get the Interviewer’s Contact Details Beforehand:
By having the recruiter’s number prior to the scheduled video call, you can contact them directly in case any technical problems occur during the video interview.
8. Be Punctual:
Login to the video conferencing program 10 minutes before the scheduled time, and close any other programs in your system unrelated to the interview, such as email, media players, etc.
9. Put Off Disruptions:
Don’t let any external factor ruin your interview; minimize disruptions by turning off your cell phone and silencing your computer notifications.
10. Don’t Be Afraid to Ask Questions:
To leave a good impression on the interviewer, have 2-3 pertinent questions ready to ask about the job position and company. Also, don’t hold back from asking the interviewer to repeat any question if you miss something due to a technical glitch.
11. Position Yourself in a Clean Environment or Set up a Virtual Background:
Ensure your interview surroundings are clean, well-lit, and clutter-free. You should not have a messy background for video interviews. If you are constrained due to reasons beyond your control, you can set up a virtual interview background on Teams, Zoom, Google Meet or Webex to leave a positive impression.
12. Download the Latest Version of Microsoft Teams , Zoom, Google Meet and Cisco Webex:
Download the video applications beforehand on your system and your phone to get familiarized with them. Do a Video and Audio configuration test Also, use professional and business-like usernames instead of random names like Mr. MoneyMaker, BossLady, Smartypants, Zoolander, Undertaker, etc.
Some Don’ts for your Next Virtual Job Interview
1. Avoid Fiddling with Your Webcam:
A video interview can be messy if you keep on adjusting your webcam. Thus, you should not fiddle with the camera as it will leave your recruiter dizzy. In case you are using your mobile for the video call, keep it in a stable place where it can’t fall.
2. Do Not Turn Off the Camera:
Despite being a camera-shy person, you should not get tempted to turn off your camera during the interview call. It is indispensable for both parties to be visible during a virtual call since it can get awkward for your potential employer to be talking to a blank screen. It may also demonstrate your lack of confidence in handling professional video calls.
3. Don’t Let Anyone Else Emerge in Your Video:
When giving a virtual interview, you need to make sure that nobody is around or behind your screen. It can come off as distracting and unprofessional if your family members or pets pop up on the screen.
4. Take the Interview Call in Loud Surroundings:
All your efforts can go in vain if the person taking the interview can’t hear your answers or only hears a part of them due to the noisy settings. Choose to sit in a secluded place where no external sound can ruin your interview.
5. Interrupt the Recruiter:
It is the biggest and most common mistake that candidates often commit during a video call. People tend to overlap communication by interrupting in between and speaking at the same time. Therefore, you should first listen to the question of the interview panel and then give your appropriate answers.
How to Set up a Virtual Background in Zoom, Microsoft Teams, Google meet and Cisco Webex?
Remote work is here to stay, which started with the Coronavirus. So be it an interview or a meeting, you should leave a good impression when on a video call. Having a background image free of clutter is one of the important steps to achieving that.
We will show you in Simple steps how to set up a virtual interview background in Zoom, Microsoft Teams, Google Meet and Cisco Webex. You can use existing custom background images, live background images, or Videos ( only available in Zoom). Also, you can put an individual image like your logo or your resume image as background to grasp the attention of the interviewer.
How to Set up a Virtual background on Microsoft Teams?

- Download the latest version of Teams.
- Microsoft Teams Official guide: Change your background in Microsoft Teams meetings Before you join:
- Open the meeting from your Teams calendar and select Join.
- On the pre-join screen, select Effects and avatars.
- Choose Standard blur or Portrait blur, or select a Teams image.
- To use your own image, select More video effects > Add new and upload a JPG, PNG, or BMP file.
- Select None to turn effects off.
During a meeting:
- Select More actions > Video effects and settings.
- Select Video effects.
- Choose a blur or image, or select Add new.
- Select Preview, then Apply.
On mobile, use Background effects on the pre-join screen, or More > Background effects during the meeting, then Done. Linux and some virtual-desktop setups do not support this. [support.microsoft]
Your virtual background image is ready now
Note: It is recommended to use images in landscape orientation mode, and you need to save the custom images locally on your desktop.
How to Set up a Virtual Background in Zoom?
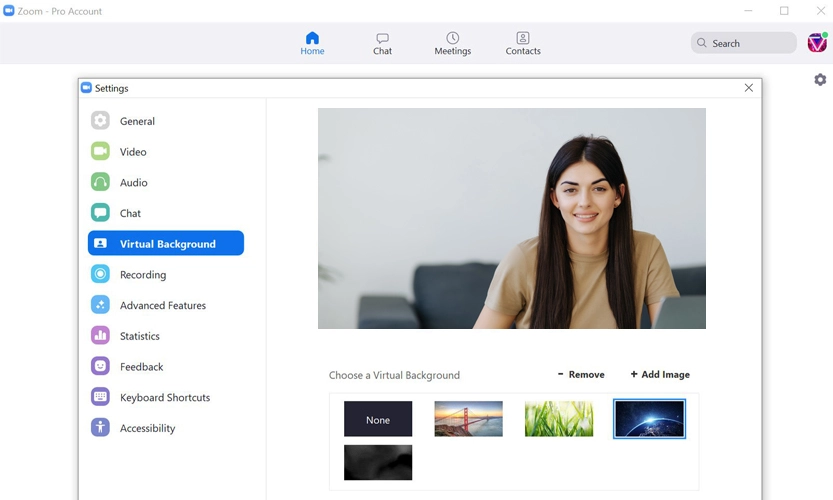
You can select any virtual background for a video interview from a wide range of background collections provided by Zoom. So, you do not have to worry if you have clutter in your background. Given Below are simple steps to set a virtual background for a Zoom interview on a laptop:
Download the latest version of Zoom:
- Official guide: Changing your virtual background image Before a meeting:
- In the Zoom desktop app, select your profile picture, then Settings.
- Open Video & effects, then Virtual backgrounds. If that tab is missing after an admin enables it, sign out and back in.
- Select None, Blur, a default image, or the add icon to upload an image or video.
- If Zoom asks you to download the virtual-background package, select Download.
- If you have a physical green screen, turn on I have a green screen and click the screen color in your preview.
During a meeting:
- Select the arrow next to Video.
- Select Video & effect settings.
- Open Virtual backgrounds and choose or upload a background. It applies while your video is on.
Images should be 24-bit PNG or JPG/JPEG, up to 15 MB. Videos should be MP4 or MOV, from 480×360 up to 1920×1080. On a phone, open More > Settings > Virtual backgrounds. [support.zoom]
How to Set up a Virtual Background for Google Meet?
Download the latest version of Google Meet
Official guide: Change backgrounds and effects in Google Meet
Before you join:
- Open Google Meet on a computer.
- Under your video, select Backgrounds and effects. The blur icon on the self view applies blur in one click.
- Open Choose backgrounds and effects.
- Slightly blur or fully blur the room, select a Meet image, or add your own image.
- Close the panel, then join.
During a meeting:
- Next to the microphone, open Video settings.
- Open Backgrounds and effects, then the Backgrounds tab.
- Choose blur, an existing image, or your own image.
- To remove effects, select Turn off visual effects, then remove the ones you want or select Remove all.
Some AI backgrounds and appearance tools are limited by account type and admin settings. Guests who are not signed in can change the background only after they are in the meeting. [support.google]
How to Set up a Virtual Background in Cisco Webex?

Download the latest version of Cisco Webex
Official guide: Use a virtual or blurred background in Webex App
Before you join:
- In the preview window, open Video options.
- Choose Blur or a preset image.
- Select + to add your own file. Desktop accepts JPG, JPEG, PNG, GIF, MOV, and MP4, up to 10 custom images. Cisco recommends at least 480×360 and no larger than 1920×1080.
- Hide Video options, then join.
During a meeting:
- Open Video options.
- Select Change virtual background.
- Choose the background and select Apply. On Mac, the button may say Save.
You can also set it any time from Settings > Video > Background. If the option is missing, your administrator has not enabled virtual backgrounds. On a phone, use Virtual background before you join, or More options > Change Virtual Background during the meeting. [help.webex]
How to do a Video and Audio test in Zoom, Microsoft Teams, Google meet and Cisco Webex?
Use each app’s built-in device test before a real meeting. Teams, Zoom, and Webex can play a tone and record your voice; Google Meet checks mic, speaker, and camera on the pre-join screen.
Do this first on every platform: plug in the headset or camera you plan to use, close other apps that may be using the mic or camera and allow the app (or browser) access to the microphone and camera in your operating-system privacy settings.
Microsoft Teams
The full echo test is Make a test call in the desktop app for Windows and Mac. Your recording is deleted immediately after the call.
- Open the Teams desktop app and sign in.
- Select Settings and more (⋯) next to your profile picture, then Settings, then Devices.
- Under Audio settings, choose the speaker and microphone you want as the defaults.
- Under Video settings, choose the camera and confirm you see yourself in the preview.
- Select Make a test call.
- Follow the Test Call Bot: wait for the prompt, then say a short sentence such as “Testing one, two, three.”
- Listen to the playback. You should hear your voice clearly and see your camera in the call.
- Read the summary. If something failed, change the speaker, mic, or camera and run the test again.
Before joining a meeting: On the pre-join screen, pick the mic, speaker, and camera from the device menus and confirm the video preview and mic level before you select Join now.
During a meeting: Select the arrow next to the microphone, then open audio or device settings. Confirm the correct speaker and mic are selected and neither is muted.
Teams on the web: Open Microsoft’s device test page, allow camera and mic access, then run the on-page checks.
Zoom
Zoom has both a settings test and a live test meeting at zoom.us/test.
Before a meeting (desktop app):
- Sign in to the Zoom desktop app.
- Select your profile picture, then Settings.
- Open the Audio tab.
- Under Speaker, select Test speaker. You should hear a ringtone. If not, pick another speaker or raise Volume.
- Under Microphone, select Test microphone, then speak. The input meter should move, and Zoom should play your voice back.
- If playback is quiet or missing, choose another microphone or adjust the input level. Optional: turn on Automatically adjust microphone volume.
- Open Video & effects (or Video). Select your camera and confirm the preview. If the image is black, pick another camera from the list.
When joining a meeting:
- If you are not set to join computer audio automatically, select Test speaker and microphone.
- If you do not hear the ringtone, select No, Try Another Speaker until you do, then select Yes.
- Speak, then confirm you hear the replay. If not, select No, Try Another Microphone.
- Select End test, then Join audio.
Mobile: In a browser, go to zoom.us/test, open the Zoom app, join with Wi-Fi or Cellular Data, allow mic access if asked, and let Zoom test speaker and mic. Select Done when finished.
Google Meet
Meet has no permanent test line. Use the pre-join screen, which Google calls the green room.
- On a computer, go to Google Meet.
- Open the meeting you were invited to, or select New meeting, then Start an instant meeting, and stop on the preview screen. Do not select Join now yet.
- At the bottom of your preview, open the microphone, speaker, and camera menus and select the devices you want. You can also use More options, then Settings, and open Audio or Video.
- Select the microphone and speak. If the level bar moves, the mic is working.
- Select the speaker, then Test speakers. If you hear the test sound, the speaker is working.
- Select the camera. If you see yourself in the preview tile, the camera is working.
- Select Join now only when those three checks pass. If you started an instant meeting just to test, leave it when you are done.
During a meeting: Select the arrow next to the microphone to change or retest the mic and speaker. Select the arrow next to the camera to switch cameras. For more controls, open More options, then Settings, then Audio or Video.
Use a matched headset for both mic and speakers. A laptop mic plus external speakers often causes echo.
Cisco Webex
Webex can test devices in the app and in a public test meeting at webex.com/test-meeting.
In the Webex app, not in a meeting:
- Open Webex and select Settings on the navigation sidebar, then Audio.
- Next to Speaker, select Test. A sound should play and the output level should move. Adjust volume if needed.
- Next to Microphone, select Test, then say a few words. The input meter should move, and Webex should play your words back.
- Open video or camera settings and confirm the preview shows the camera you intend to use.
Before you join:
- On the preview screen, select Audio options, then Audio Settings (wording can also appear as Settings in the preview window).
- Choose Computer audio, then select the speaker and microphone.
- Select Test for the speaker, then Test for the microphone and speak until you hear the playback.
- Turn video on and confirm the camera preview. Allow camera and microphone access if the browser or app asks.
- Mute or stop video only if you want to join that way, then select Join meeting.
During a meeting: Select Audio options, then Test speaker and microphone, or open More options and select Speaker, microphone, and camera. Test the speaker, record a short mic sample, and confirm the camera preview.
Full test meeting:
- Go to webex.com/test-meeting.
- Enter your name and email, then select Join.
- Install or open the Webex app if prompted.
- Choose computer audio, run the speaker and microphone tests, start video, then select Join meeting.
- Check the in-meeting controls, then select Leave meeting.[help.webex]
For a network check separate from devices, Cisco also offers the Webex Network Test. That tests connection quality, not your mic or camera.
If a test fails
- Allow microphone and camera for the app in Windows Privacy & security, macOS System Settings > Privacy & Security, or the browser site settings.
- Unplug and reconnect USB headsets and webcams, or switch from Bluetooth to a wired headset if audio cuts out.
- Pick the device by name in the app. “Default” often points at the wrong speaker after you plug something in.
- Quit other meeting apps. Only one app can use many webcams at a time.
- If the mic meter moves but you hear nothing, the speaker is the problem. If the meter never moves, the microphone or its permission is the problem.
Restart the app after changing devices. On Zoom mobile and some browsers, permissions are requested only the first time you join.
Conclusion
These essential tips can help you create a good impression in your next interview or meeting.
A clear audio and video setup is part of interview readiness. Use these checks on Microsoft Teams, Zoom, Google Meet, and Cisco Webex before your next interview so the conversation stays on your skills, not a frozen camera or a silent microphone.
At SynergisticIT, we help enrollees of the Job Placement Program (JOPP) prepare on these practical points so they can show up ready and perform well in interviews. To explore JOPP, visit the JOPP page or contact SynergisticIT at (510) 550-7200.